Building on the technical terminology from the second part in our terminology series, we will now delve into the installation terms used in the industry.
PART 3
Vinyl flooring installation terms
-
Sub-floor: Defined as the foundation for a floor or building; the flat surface on which all other layers rest. Also referred to as the substrate. The condition of the sub-floor is critical for a successful vinyl installation. The sub-floor must be dry, strong, hard, smooth and sufficiently level for a quality installation. Click here to view our infographic on testing all these factors.
-
Level screed: In the case of vinyl flooring, a Class 1 screed should be stipulated to ensure a completely level screed (refer definition below).
Class 1 screed: As Per SANS 0155 2009 ‘Accuracy in Buildings’ (refer ‘Vinyl flooring industry organisation acronyms’) a Class 1 screed is defined as: ‘Permissible deviation at any point under a 3m straight edge placed level in one direction, is no greater than a maximum of 3mm’. Your best bet to achieve this? Specify a self-leveler; specify at least a 5mm thickness (we recommend assessing the substrate to determine what thickness is required to attain an average of at least 5mm)
-
Self-leveling screed: Self-leveling concrete is polymer-modified cement that has high flow characteristics and, in contrast to traditional concrete, does not require the addition of excessive amounts of water for placement. Self-leveling concrete is typically used to create a flat and smooth surface with a compressive strength similar to or higher than that of traditional concrete prior to installing interior floor coverings.
Recommended article: Correct installation of screed is both an art and a science, we have devised this infographic to help you to master the key elements of screed installation and to get it done right.
Recommended article: If you are interested in finding out more about moisture testing, read our article Moisture testing like a pro!
-
Relative humidity (RH): Relative humidity is the indicator that is used to assess the content of residual moisture within a screed. Knowing exactly what the RH is will allow you to understand its effect on screed performance.
So how do we test for RH in a screed? As mentioned previously, testing surface moisture is simply not reliable enough. A good measure is to test approximately 40% into the depth of the screed and to do so, you can use professional measuring instruments such as a Wagner or Protimeter.
Wagner and Protimeter readings
|
|
Wagner Meter
|
Protimeter
|
|
|
RH below 75%
|
RH above 75%
|
18 and below
|
18 and above
|
|
Adequately dry for vinyl installation
|
♦ |
|
♦ |
|
|
Not dry
|
|
♦ |
|
♦ |
|
Remedial steps required*
|
|
♦ |
|
♦ |
*Remedial steps include allowing more drying time, grinding open the screed or the best solution, applying a moisture barrier which will mitigate all moisture risks.
-
Moisture barrier: A cementitious or epoxy based product that is applied under a screed or self leveling screed to prevent moisture from coming into contact with the self leveler or adhesive. Moisture vapour transmission in time will delaminate the screed, soften the self leveler and emulsify the adhesive causing a horribly uneven floor and very often, your floor covering to lift. A moisture barrier provides a time saving, long term protection and peace of mind.
-
Adhesive: The substance used to ‘glue’ the vinyl floor to the screed.
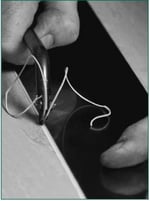
- Grooving: Before welding vinyl sheets together, some of the material must be removed from the seam between the flooring sheets, creating a groove that will accept the vinyl welding rod. We recommend a “U” shape which leaves a semi-circular groove in the vinyl. This should extend 2/3 into the vinyl.
- Welding: Vinyl sheeting needs to be welded to form an impervious surface. However,
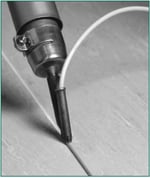 welding will only aid maintenance of high standards of hygiene if it is executed Guidelines should be carefully adhered to since short cuts taken in welding create potential problems with seam failures.
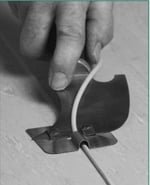
- Trimming the weld: This refers to the process of neatening and flattening the welded join between the floor sheets. Once a weld has been completed, it needs to be trimmed twice to achieve a flat smooth weld. The first trim should be done when the weld is still warm and the second when it has cooled. If this process is not done correctly it can produce a concave or convex weld that will form a dirt trap.
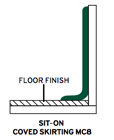
- Sit-on Coving: Sit-on coving is fitted after the flooring has been laid, and can therefore be used to replace an old skirting, as well as to provide a neat finish to a new floor. These tough and durable covings give protection to the wall decorations at floor level.
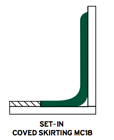
- Set-in Coving: Skirting of this type is fitted before the flooring is installed, where a simple butt joint is required. Welded to the flooring, this provides a secure joint.
- Cove Former: Where ease of maintenance and hygiene are important, sheet flooring may be taken up the wall, using a Cove Former which creates a radius.
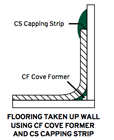
- Capping Strip: Applied to the edge of the flooring, provides a neat finish to the installation and ensures a continuous, sealed surface. The benefits of a sealed, easily maintained surface are invaluable in hospitals and other similar locations where hygiene is of paramount importance.
- Butterfly joints on an internal and external corner: This installation method involves moving the welded join on the coved sheeting from the sharp corner to the left of right of it in order to avoid splitting on the corner. This provides a much stronger join on the flat area of the coved sheeting instead of on the weaker corner.
The last part of our terminology series debunks the acronyms that are used in the industry. Keep an eye out for it next week.
If you missed it, you can read the first part in our series, vinyl flooring jargon 101 and the second part, vinyl flooring 201. Be sure not to miss out on the last part of our terminology series, vinyl flooring jargon 401.
Download the definitive guide to vinyl flooring jargon, where we delve into all the jargon used in the flooring industry.
The guide aims to categorise and demystify some of the flooring terminology and acronyms to make it easier to understand and work with vinyl flooring products.
